 This is the startup screen of the program, displaying an example of an already entered polygon. Below the screen you can see a small text area containing instructions or an explanation depending on what screen is displayed.
Above the screen (not displayed) is the options menu, which allows you to display the in-program help browser, save a completed polygon (see below), or load a previously saved polygon.
Below the screen on the right (not displayed) is a panel of buttons you can use to navigate between screens. To enter your polygon, click the Next or New Part buttons.
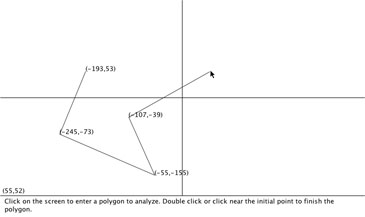 Here you can enter the part you wish to analyze by clicking on the screen or typing in the exact coordinates in the panel on the lower left (not displayed). When you have entered three non-collinear points, you can complete your polygon by doing one of the following three options:
- clicking in the box that appears when the cursor approaches the first-entered point
- double clicking on the screen (note that the first click will add one more point), or
- clicking the Finish button, which appears on the lower right when the text fields are empty. (not displayed)
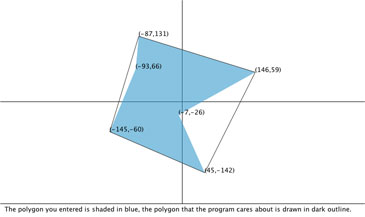 This is essentially a picture of the part you entered, shifted so that the center of the smallest circle that encloses all of its points is at the origin. The shaded region is the exact polygon you entered and the line surrounding it describes its convex hull, which is what the program uses for its analysis.
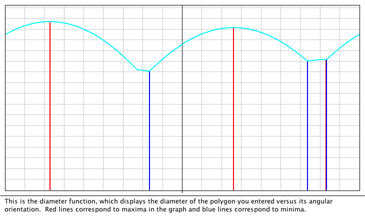 This is a graph of your polygon's diameter function, which maps your polygon's angular orientation to its width. The maxima and minima are marked by red and blue lines.
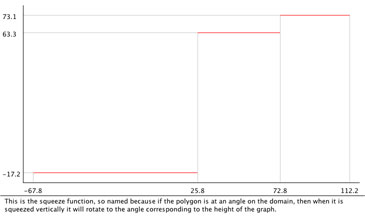 This is a reinterpretation of the diameter function called the squeeze function, which maps the initial angle of your polygon to its final angle after a gripper squeezes it. That is, if your polygon's angular orientation is at a certain place on the domain of this function, then when it is squeezed it will rotate to the angle corresponding to the height of the graph.
 The animation on this screen is really what makes the purpose and power of the algorithms come alive. When your part enters the grippers, no matter what angle it starts out in (limited by the periodicity of the extrema of the diameter function) it ends up in a single final angle.